Comparison7 min read
DHT22 vs DS18B20: Which Temperature Sensor Should You Use?
A detailed comparison between the DHT22 and DS18B20 temperature sensors - accuracy, humidity support, wiring complexity, communication protocol, and which one fits your Arduino or ESP project best.
Temperature sensing is one of the most common tasks in Arduino projects. Two sensors that come up again and again are the DHT22 and the DS18B20. They look similar on the surface - both measure temperature, both use a single digital pin, both are beginner-friendly - but they are designed for different situations.
The DHT22 is made by Aosong and combines temperature and humidity sensing in one package. The DS18B20 comes from Maxim Integrated (now Analog Devices) and focuses purely on temperature with a robust industrial-grade protocol. This article compares them across accuracy, features, wiring, and code so you can choose the right one for your next project. Let us start with a quick look at the specs.
Quick Comparison
| Feature | DHT22 | DS18B20 |
|---|---|---|
| Manufacturer | Aosong | Maxim / Analog Devices |
| Temperature range | -40 to 80 C | -55 to 125 C |
| Accuracy | +/- 0.5 C | +/- 0.5 C (-10 to 85 C) |
| Resolution | 0.1 C | 9 to 12 bits (configurable) |
| Humidity | Yes (0-100% RH, +/- 2-5%) | No |
| Sampling rate | Every 2 seconds (0.5 Hz) | 94 ms to 750 ms (depending on resolution) |
| Communication | Custom single-wire protocol | Dallas 1-Wire protocol |
| Max cable length | Short (under 5 meters) | Long (up to 50 meters) |
| Multiple sensors on one pin | No | Yes (unique 64-bit address) |
| Supply voltage | 3.3V to 5V | 3.0V to 5.5V |
| Current during read | 2.5 mA max | 1.5 mA max |
| Typical cost | $4-6 | $2-4 |
When To Use The DHT22
The DHT22 uses a capacitive humidity sensor and a thermistor to measure the surrounding air. A small chip inside handles the analog-to-digital conversion and sends the data as a digital signal. Adafruit has a complete guide on the DHT sensor family with schematics, code examples, and datasheets if you want the full technical background.
The sensor reads both temperature and humidity over a single data pin. It is factory calibrated, so readings are consistent without manual configuration. According to the datasheet, the DHT22 draws only 2.5 mA during conversion and can operate from 3.3V to 5V, making it compatible with both Arduino Uno and ESP32-C3 boards.
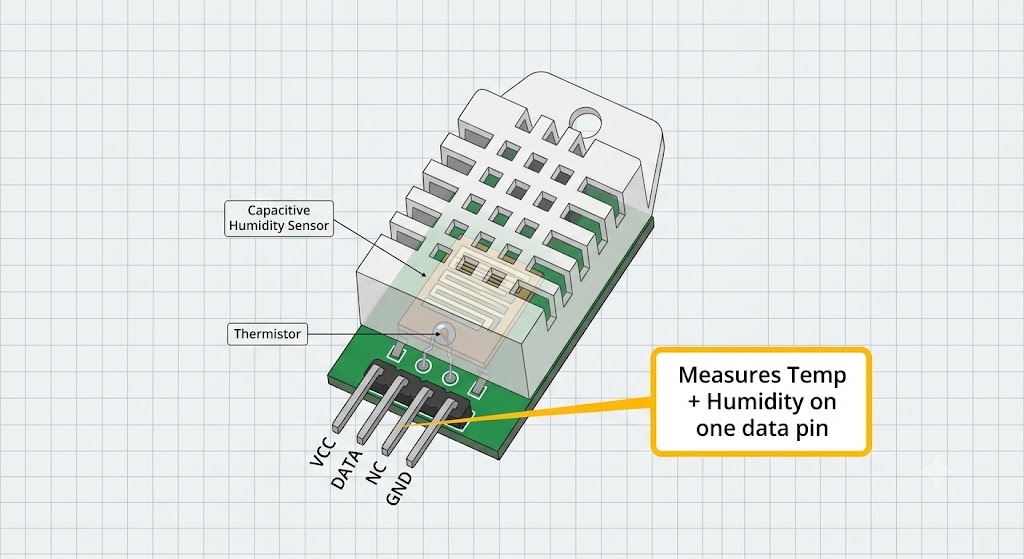
DHT22 sensor internal components
Built-in Humidity Sensing
The biggest reason to pick the DHT22 is humidity. The DS18B20 cannot measure humidity at all. If your project needs both temperature and humidity - a weather station, a greenhouse monitor, or an indoor air quality display - the DHT22 gives you both values from one sensor.
Here is what the DHT22 does well:
- Measures temperature and humidity from a single sensor - no second module needed.
- Humidity range 0-100% with 2-5% accuracy, temperature range -40 to 80 C with +/- 0.5 C accuracy.
- Factory calibrated - readings are consistent without manual configuration.
- Simple wiring: power to VCC, ground to GND, data to any digital pin with a 4.7K-10K pull-up resistor.
- Great for weather stations, room monitors, greenhouses, and indoor air quality projects.
Limitations to Know
The DHT22 has two main tradeoffs. First, it can only be read once every two seconds (0.5 Hz sampling rate). If you try to read it faster, the values may become stale or the sensor may not respond. Second, each sensor needs its own data pin - unlike the DS18B20, the DHT22 is not Dallas 1-Wire compatible, so you cannot share a pin across multiple sensors. The sensor body measures 15.1mm x 25mm x 7.7mm with 4 pins at 0.1 inch spacing.
When To Use The DS18B20
The DS18B20 is a temperature-only sensor that communicates over the Dallas 1-Wire bus. Each sensor has a unique 64-bit serial code burned into its ROM during manufacturing, which allows you to connect multiple sensors on the same data wire and address them individually. According to the datasheet from Analog Devices, the DS18B20 can operate from 3.0V to 5.5V and has a temperature range of -55 C to +125 C with +/- 0.5 C accuracy from -10 C to 85 C.
The sensor comes in several packages. The most common is the TO-92 transistor-style package that looks like a standard transistor. There is also a waterproof probe version with a stainless steel tip and a 1-meter silicone cable, which is popular for aquarium monitoring, outdoor weather stations, and industrial sensing because you can submerge it or leave it exposed to rain.
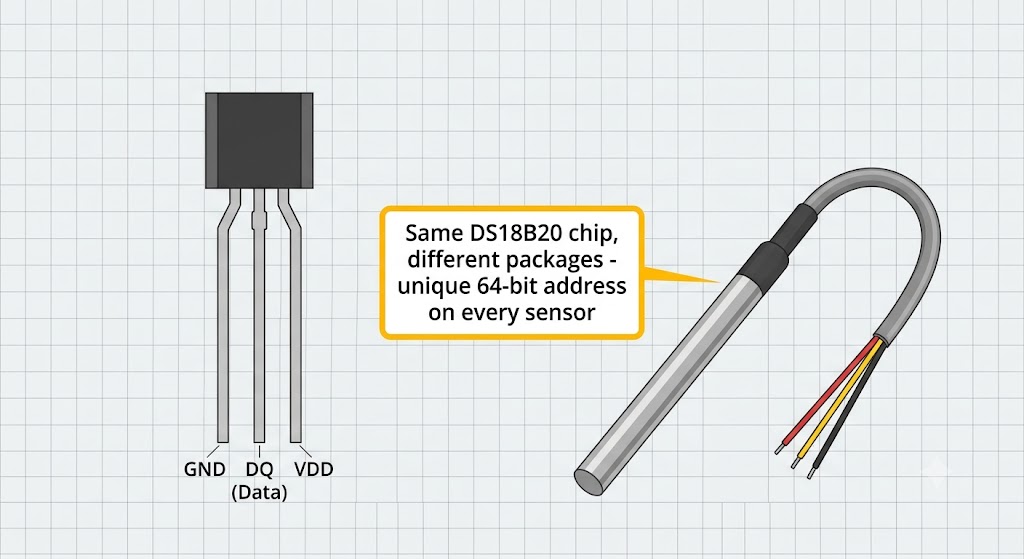
DS18B20 sensor TO-92 and waterproof probe versions
Configurable Resolution
The DS18B20 lets you choose between four resolution settings: 9, 10, 11, or 12 bits. Higher resolution gives more precise readings but takes longer to convert. At 9-bit resolution, a reading takes only 94 milliseconds with 0.5 C steps. At the maximum 12-bit resolution, it takes 750 milliseconds with 0.0625 C steps. You can change the resolution in your code using the DallasTemperature library without any hardware changes. Random Nerd Tutorials has a thorough guide on using DS18B20 with Arduino covering single and multiple sensor setups.
Multiple Sensors on One Pin
This is the DS18B20 killer feature. Because each sensor has a unique 64-bit address, you can wire 5, 10, or even 20 sensors on the same data pin and read them one by one. The Arduino calls
sensors.requestTemperatures() once to tell all sensors to measure simultaneously, then reads each result using getTempCByIndex(0), getTempCByIndex(1), and so on. Each sensor responds only when addressed by its unique ID.Here is where the DS18B20 excels:
- Multiple sensors on one pin - up to dozens using the same 1-Wire bus.
- Long cable runs - the 1-Wire protocol works reliably up to 50 meters.
- Waterproof probe version available - submersible and weatherproof with stainless steel tip.
- Configurable resolution from 9 to 12 bits (94 ms to 750 ms conversion time).
- Wide temperature range from -55 C to 125 C, suitable for extreme environments.
- Can operate in parasite mode - derives power from the data line, no external power needed.
Wiring Comparison
Both sensors use three wires in normal operation, but there is one important difference: the DS18B20 requires a 4.7k ohm pull-up resistor on the data line at all times. The DHT22 also needs a pull-up resistor (typically 4.7K to 10K), but many breakout boards include it already. If you buy a bare DHT22 sensor, you still need to add one.
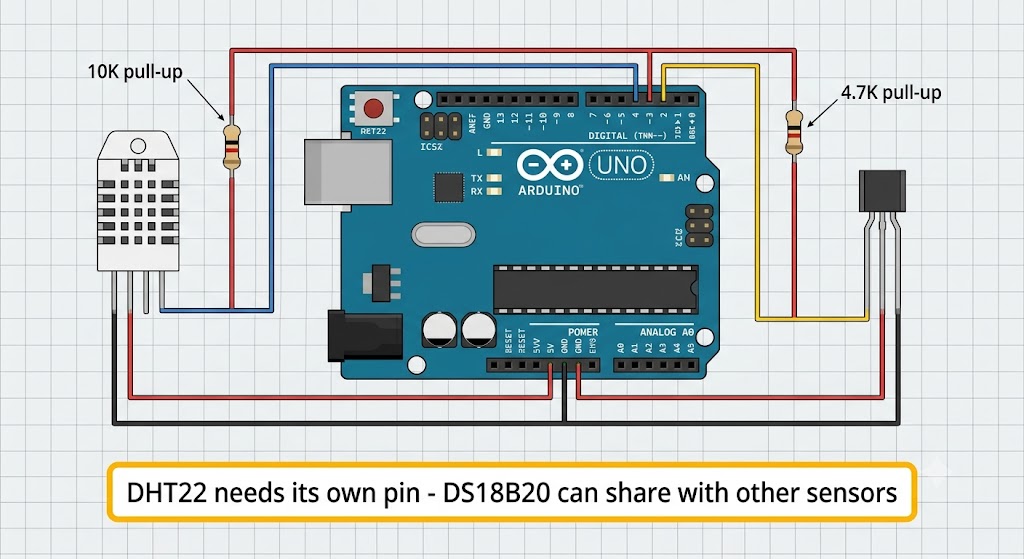
DHT22 and DS18B20 wiring diagram with Arduino
| Connection | DHT22 | DS18B20 |
|---|---|---|
| VCC | 3.3V or 5V | 3.0V to 5.5V |
| GND | GND | GND |
| Data pin | Any digital pin | Any digital pin (shared across multiple sensors) |
| Pull-up resistor | 4.7K to 10K ohm (often on module) | 4.7K ohm (required) |
| Multiple sensors | Each needs its own pin | All share one pin |
The DS18B20 also supports parasite mode, where the sensor draws power from the data line instead of a separate VCC pin. In this mode, you only need two wires (data and ground) plus the pull-up resistor. However, normal mode with three wires is more reliable and recommended for beginners.
Code Comparison
The DHT22 uses the DHT sensor library by Adafruit. The DS18B20 uses the OneWire library by Paul Stoffregen plus the DallasTemperature library by Miles Burton. Both are available through the Arduino Library Manager.
DHT22 Code
#include <DHT.h>

#define DHTPIN 2
#define DHTTYPE DHT22

DHT dht(DHTPIN, DHTTYPE);

void setup() {
  Serial.begin(9600);
  dht.begin();
}

void loop() {
  float t = dht.readTemperature();
  float h = dht.readHumidity();
  Serial.print("Temp: ");
  Serial.print(t);
  Serial.print("C  Humidity: ");
  Serial.println(h);
  delay(2000);
}
DS18B20 Code
#include <OneWire.h>
#include <DallasTemperature.h>

#define ONE_WIRE_BUS 2

OneWire oneWire(ONE_WIRE_BUS);
DallasTemperature sensors(&oneWire);

void setup() {
  Serial.begin(9600);
  sensors.begin();
}

void loop() {
  sensors.requestTemperatures();
  float t = sensors.getTempCByIndex(0);
  Serial.print("Temp: ");
  Serial.print(t);
  Serial.println("C");
  delay(1000);
}
The DHT22 code is shorter because it reads temperature and humidity in one call. The DS18B20 code uses a two-step process:
requestTemperatures() starts measurement on all sensors, then getTempCByIndex() retrieves each result. This two-step design is what makes multi-sensor operation possible - one request, many readings.Which One Should You Pick?
Here is a quick summary to help you decide:
- Pick the DHT22 if you need temperature and humidity together, your project stays indoors, and you only need one sensor per pin. It is the simpler option for weather stations and room monitors. The Adafruit DHT guide has everything you need to get started.
- Pick the DS18B20 if you only need temperature, want to use multiple sensors on one pin, need long cable runs, or require a waterproof probe for outdoor use. It gives you more flexibility for complex projects. The Random Nerd Tutorials guide covers multiple sensor setups in detail.
Both sensors work well with Arduino Uno and ESP32-C3. The DHT22 component guide and other sensor guides on IoTSimulator can help you get started with wiring and code.
Categories for this post
Tags
#DHT22 #DS18B20 #temperature #sensor #comparison #arduino

About The Author
Muhammad Ichsanul FadhilI am a 21-year-old IoT enthusiast who loves microcontrollers and exploring new components. I built IoTSimulator to help beginners learn without needing a pile of hardware.