Comparison7 min read
LCD1602 vs SSD1306 OLED: Choosing the Right Display
Compare the classic LCD1602 character display with the modern SSD1306 OLED display - readability, power consumption, wiring complexity, I2C vs parallel, and which one fits your Arduino or ESP project.
Displays are one of the most satisfying parts of an Arduino project. Instead of watching serial monitor numbers scroll by, you can show text, values, and even simple graphics directly on a screen. Two of the most common options for beginners are the LCD1602 character display and the SSD1306 OLED display.
Both are affordable and well supported, but they are designed for different use cases. This comparison covers readability, wiring, power, and code so you can pick the right one.
Let us start with a quick look at how they compare on paper, then we will dive into each one in detail.
Quick Comparison
| Feature | LCD1602 | SSD1306 OLED |
|---|---|---|
| Display type | Character LCD (HD44780) | Monochrome OLED |
| Resolution | 16 chars x 2 rows | 128 x 64 pixels |
| Backlight | Yes (LED backlight) | None (self-emissive) |
| Viewing angle | Limited (best head-on) | Wide (up to 170 degrees) |
| Power consumption | 50-100 mA (with backlight) | 15-25 mA |
| Interface options | Parallel (8 or 4 bit) or I2C | I2C or SPI |
| Wires needed (I2C) | 4 (VCC, GND, SDA, SCL) | 4 (VCC, GND, SDA, SCL) |
| Graphics support | No (predefined characters only) | Yes (pixel-level control) |
| Custom characters | Up to 8 custom (5x8 pixels) | Any bitmap |
| Supply voltage | 5V | 3.3V to 5V (with regulator) |
| Typical cost | $3-5 (with I2C module) | $4-7 |
When To Use The LCD1602
The LCD1602 uses the Hitachi HD44780 controller - the same chip that has powered character LCDs for decades. Liquid crystals were first discovered in 1888, and the first practical displays came from RCA in the 1960s. The technology works by sandwiching liquid crystals between polarizers. When voltage is applied, the crystals twist to block or pass backlight, creating the text you see.
The LCD1602 is widely available, very cheap, and extremely well documented. The HD44780 has been in production for decades, so the library support is rock solid - the LiquidCrystal library has been part of the Arduino IDE since the beginning.
Here is a quick recap of what makes the LCD1602 a good choice:
- It only shows text and numbers, no graphics - perfect for simple readouts like temperature or counter values.
- It costs around $3-5 with an I2C module, making it the cheapest display option.
- Thousands of online tutorials use this exact display, so finding example code is easy.
- The backlight keeps it readable in bright rooms and outdoor light.
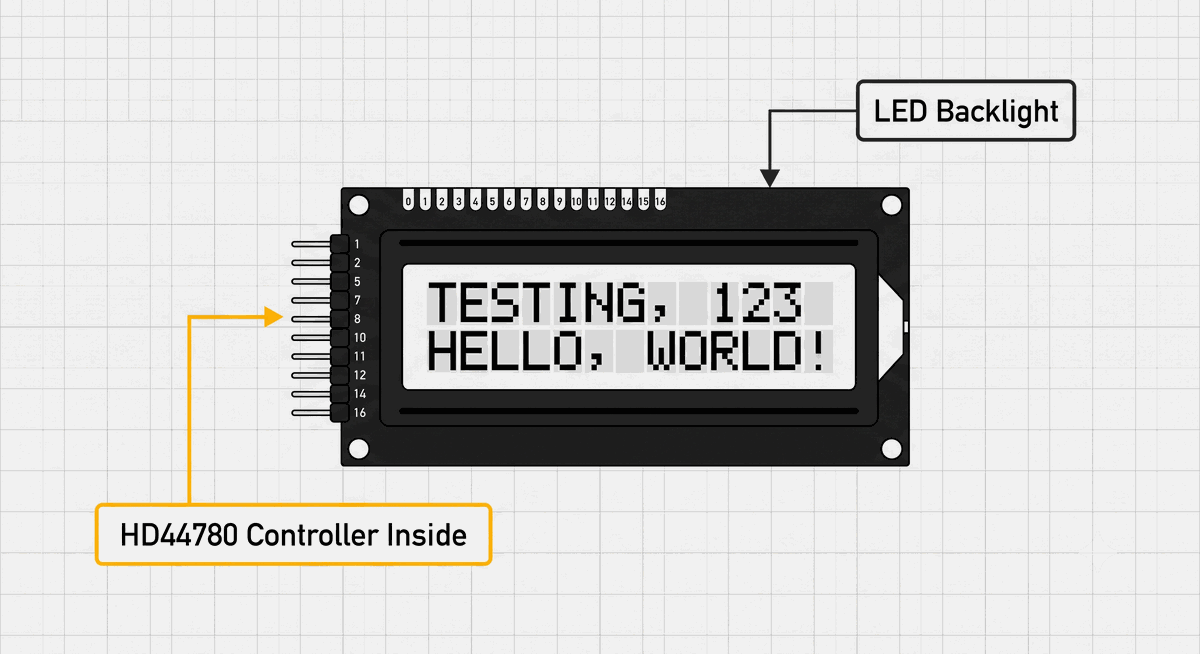
LCD1602 display module with HD44780 controller
Best for Simple Text Readouts
LCD technology works by manipulating light rather than emitting it. A backlight shines through a layer of liquid crystals that twist or untwist when voltage is applied. This twisting action either blocks the light or lets it pass, creating the characters you see. The first practical LCDs were developed in the 1960s at RCA, and the technology has been improving ever since. The LCD1602 has 16 columns and 2 rows, giving you 32 character positions total. Each character is built from a 5x8 pixel grid, which is enough for letters, numbers, and simple symbols.
Because LCDs rely on a backlight, they work well in brightly lit rooms and even outdoors. The technology does not wash out in sunlight the way emissive displays sometimes do. That is one reason you still see LCDs in industrial equipment, car dashboards, and outdoor instruments. Circuit Basics has a great guide on setting up the LCD1602 with Arduino if you want to see the wiring and code in action.
Now let us look at what this means when you actually use an LCD1602 in your projects.
The LCD1602 is built for one thing: showing text clearly. It cannot draw graphics, but it does not need to. If your project displays a temperature value, a timer countdown, or a simple status message, the LCD1602 handles it perfectly. The tradeoff is worth it when you consider the price - at $3-5, it is the cheapest display you can add to an Arduino project.
Here are the situations where the LCD1602 shines:
- Simple readouts. Temperature, humidity, counter values, timer digits - anything that fits in 32 characters per screen.
- Budget builds. At $3-5 with an I2C module, it is the cheapest way to add a display to your project.
- Legacy tutorials. Most beginner Arduino books and courses use the LCD1602. Following along is plug-and-play.
- Outdoor readability. Reflective LCDs can be readable in direct sunlight, unlike emissive displays.
One advantage of the LCD1602 is custom characters. You can define up to eight of your own symbols, each as a 5x8 pixel grid. There are online tools that let you design them visually. This is useful for creating battery icons, arrows, or degree symbols for temperature readouts.
When To Use The SSD1306 OLED
The SSD1306 OLED display produces crisp, high-contrast text and graphics that are readable from almost any angle. Each pixel is individually lit, so there is no backlight bleeding and no contrast loss. Text appears sharp and black on a deep black background, which looks much more modern than the LCD green-on-gray aesthetic.
Graphics and Visual Flexibility
OLED stands for organic light-emitting diode. Unlike an LCD, which needs a separate backlight, each pixel in an OLED display generates its own light. When a pixel is off, it emits no light at all, producing true black. That is why OLED displays have infinite contrast ratio and look so much sharper than LCDs.
The first practical OLED device was built by Kodak researchers Ching Wan Tang and Steven Van Slyke in 1987. Since then, the technology has improved rapidly and is now used in high-end smartphones, televisions, and wearable devices. The SSD1306 controller brings that same OLED technology to Arduino-sized projects at a very affordable price.
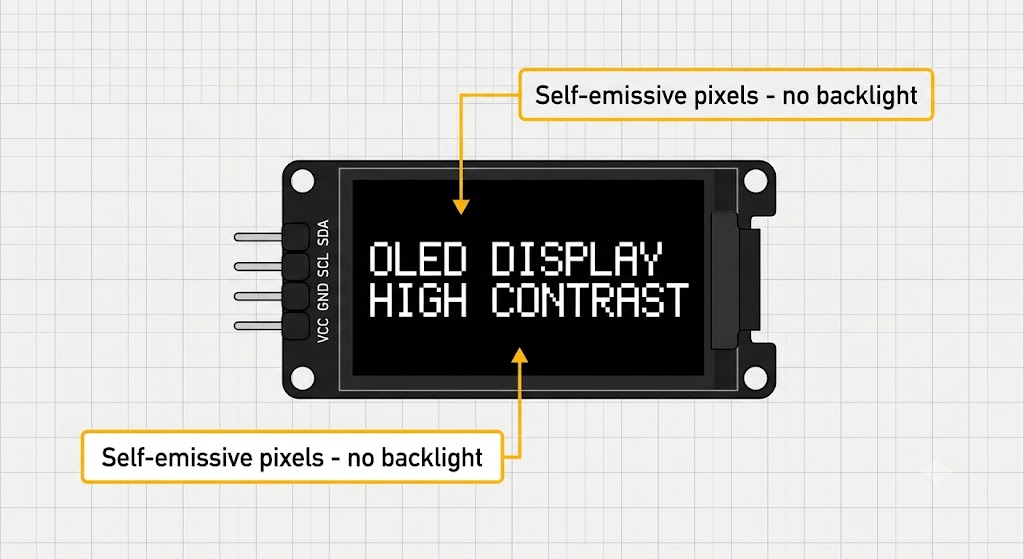
SSD1306 OLED display module
The SSD1306 OLED is not just a display - it is a canvas. Because every pixel is individually controllable, you can draw anything: bar charts for sensor data, battery level icons that deplete in real time, small animations, or even text in multiple font sizes on the same screen. The Adafruit GFX library provides drawing primitives like lines, rectangles, circles, and text rendering that make complex layouts easy to build.
The SSD1306 is the better choice when:
- Graphics are needed. You can draw charts, icons, progress bars, small animations, or even simple game graphics using the Adafruit GFX library.
- Viewing angle matters. The OLED is readable up to 170 degrees - perfect for wearable or handheld projects.
- Power is limited. At 15-25 mA, the OLED uses half the power of an LCD with backlight on. Better for battery-powered builds.
- You want a clean look. The deep black background and sharp white text give finished projects a polished, professional appearance.
The pixel-level control opens up possibilities the LCD1602 cannot match. The Adafruit SSD1306 library combined with the Adafruit GFX library gives you drawing functions for lines, rectangles, circles, text in multiple sizes, and bitmap images. You can display sensor data as a bar graph, draw a battery icon that depletes in real time, or show a small bitmap logo at startup.
OLEDs also consume less power than LCDs with the backlight on. The LCD1602 draws 50-100 mA just to keep the backlight lit, whether you are showing one character or filling the screen. The SSD1306 draws 15-25 mA, and because only lit pixels consume power, you save even more energy by keeping most of the screen black. For battery-powered projects, that difference can mean hours of extra runtime. In the I2C version, wiring uses the same four pins as the LCD1602 with an I2C backpack: VCC, GND, SDA, SCL.
Wiring Comparison
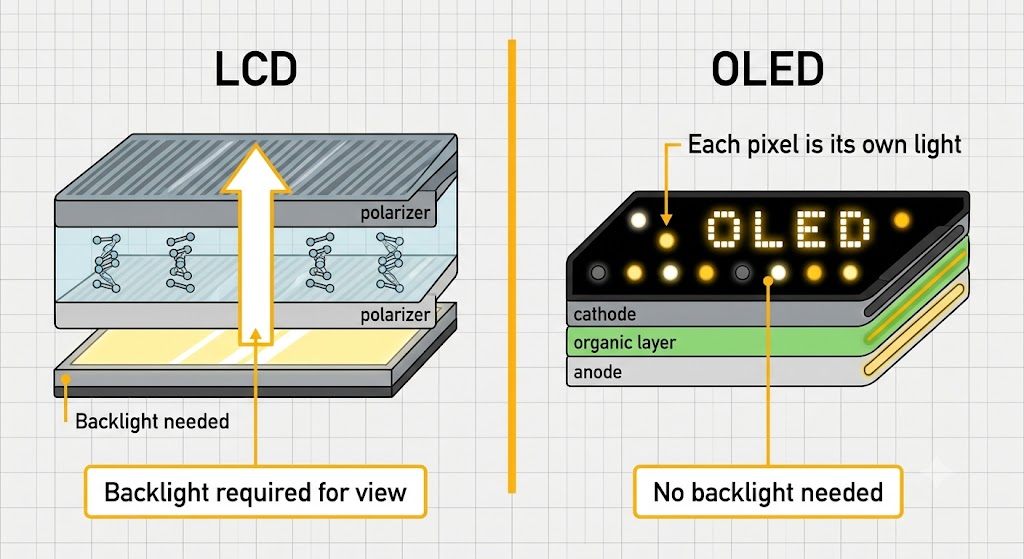
LCD vs OLED technology comparison
Both displays can be connected using I2C, which uses only four wires. The table below shows the standard wiring for an Arduino Uno.
| Display Pin | Arduino Uno |
|---|---|
| VCC | 5V |
| GND | GND |
| SDA | A4 |
| SCL | A5 |
For the LCD1602 without an I2C backpack, you need 6 digital pins for 4-bit mode (RS, E, D4, D5, D6, D7) plus power and ground.
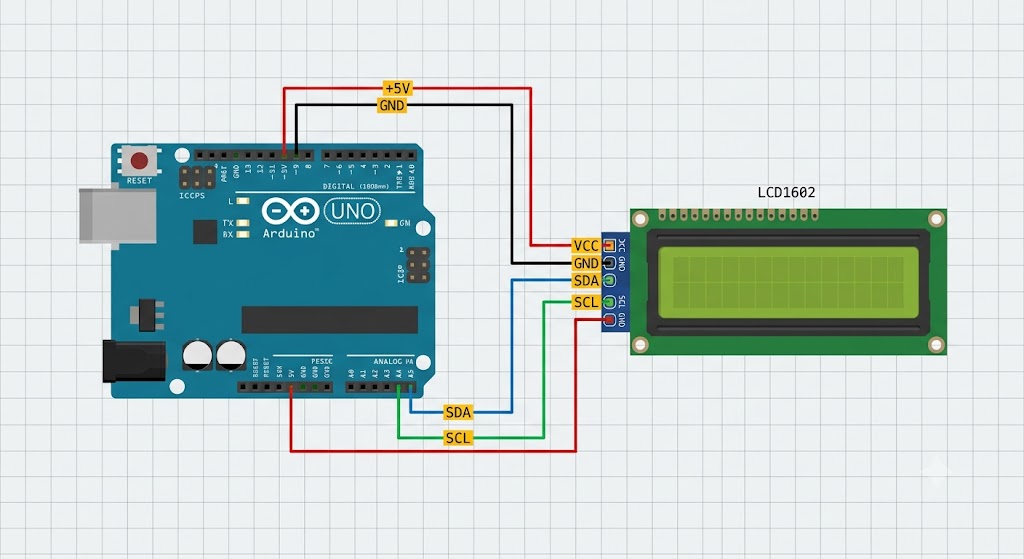
LCD1602 I2C wiring diagram with Arduino Uno
With I2C, both displays are equally easy to wire. The real difference appears when you do not use I2C: the LCD1602 needs up to 11 pins in 8-bit mode or 6 pins in 4-bit mode, plus power and ground. The SSD1306 only offers I2C and SPI, so it always uses few pins. On a small board like the Arduino Nano, saving those extra pins matters for larger projects.
Code Comparison
LCD1602 Code
#include <LiquidCrystal_I2C.h>
LiquidCrystal_I2C lcd(0x27, 16, 2);

void setup() {
  lcd.init();
  lcd.backlight();
  lcd.setCursor(0, 0);
  lcd.print("Hello!");
  lcd.setCursor(0, 1);
  lcd.print("Temp: 24.5C");
}

void loop() {}
SSD1306 Code
#include <Wire.h>
#include <Adafruit_GFX.h>
#include <Adafruit_SSD1306.h>
#define SCREEN_WIDTH 128
#define SCREEN_HEIGHT 64
Adafruit_SSD1306 display(SCREEN_WIDTH, SCREEN_HEIGHT, &Wire, -1);

void setup() {
  display.begin(SSD1306_SWITCHCAPVCC, 0x3C);
  display.clearDisplay();
  display.setTextSize(2);
  display.setTextColor(WHITE);
  display.setCursor(0, 10);
  display.println("Hello!");
  display.setTextSize(1);
  display.setCursor(0, 35);
  display.print("Temp: 24.5C");
  display.display();
}

void loop() {}
Both code examples do the same thing - display text - but the SSD1306 version also sets up graphics drawing capabilities.
For a quick summary of the differences:
- LCD1602: best for text-only projects, lowest cost, huge tutorial support. Choose this when you just need to show numbers or short messages.
- SSD1306 OLED: best for graphics, wide viewing angles, low power, modern look. Choose this when appearance or visual flexibility matters.
Which One Should You Pick?
Pick the LCD1602 if your project only needs simple text output, you want the cheapest option, or you are following a tutorial that uses the classic LCD wiring.
Pick the SSD1306 OLED if you want a cleaner look, need graphics or icons, care about power consumption, or want a wide viewing angle for a portable project.
Categories for this post
Tags
#LCD1602 #SSD1306 #OLED #display #comparison #arduino #I2C

About The Author
Muhammad Ichsanul FadhilI am a 21-year-old IoT enthusiast who loves microcontrollers and exploring new components. I built IoTSimulator to help beginners learn without needing a pile of hardware.