This article is a guide about the LED Ring. We will explain how it works, show how it is wired, and walk through an Arduino example you can use in your own projects.
The LED Ring is useful when a project needs animated light instead of a single indicator LED. It works especially well for progress effects, status feedback, and small visual dashboards where a circle feels more expressive than a straight strip. In practice, that shape makes motion look more intentional, even when the sketch itself is simple.
Before we jump into the details, it helps to look at the real module first so the circular layout and the pin side are easier to understand.
Description
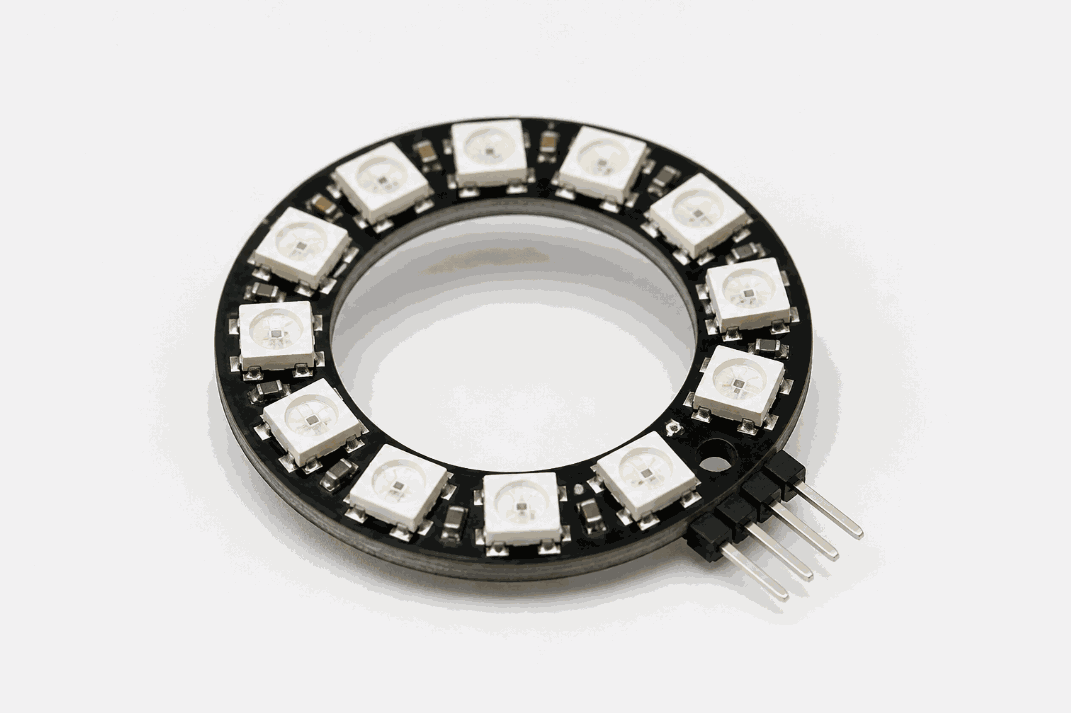
An LED ring is a circular group of addressable LEDs. Each LED can be controlled individually, so the ring can show colors, progress bars, moving lights, or simple animations.
Because the LEDs are arranged in a circle, the output feels more expressive than a regular strip or a single LED. That makes it useful for timers, status rings, decorative effects, and compact dashboards where a quick visual cue matters more than text.
Most LED rings use NeoPixel-compatible WS2812 LEDs, which means one data line can control all of the LEDs in the ring. That keeps the wiring simple even though the visual effect can be quite rich.
Features
Here are the main things to know about the LED Ring:
| Feature | What it means |
|---|---|
| Addressable LEDs | Each LED can be controlled separately. |
| Circular layout | Great for status rings and radial progress indicators. |
| Single data line | Easy to wire and expand with more LEDs or rings. |
| Color effects | Supports brightness control and many color combinations. |
| Animation friendly | Useful for sweeps, breathing effects, and countdowns. |
| Arduino friendly | Works well with the Adafruit NeoPixel library. |
The ring gives you a lot of visual feedback without needing many pins. That is why it is such a popular part in compact interactive projects, especially when you want the output to feel polished without adding a lot of hardware.
How Does It Work?
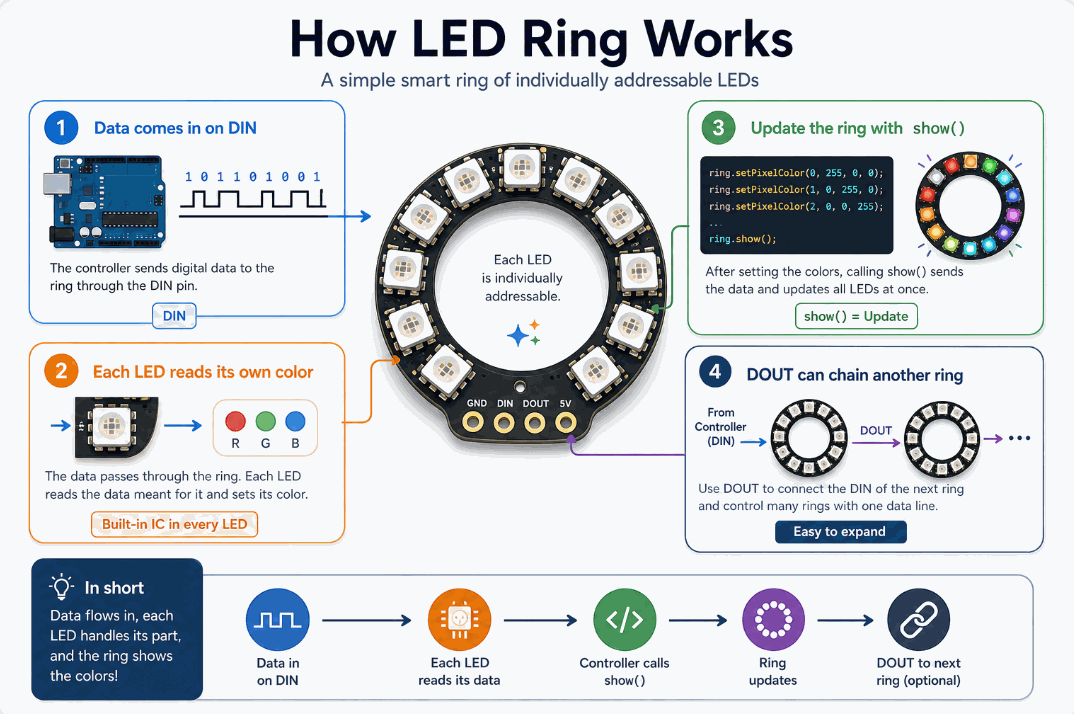
The LED ring receives a serial data stream on DIN. Inside the ring, each LED reads the data for itself and passes the rest along to the next LED. That is what makes the ring easy to chain and control from one Arduino pin.
When the sketch updates the ring, it sends the new color values to the LEDs and then calls show() so the ring displays the change. The LEDs do not light randomly; they follow the exact pixel order and brightness values written by the code, which is why the animation stays in sync.
Data Flow
The first LED in the chain reads the first color data it sees. The next LED reads the next part of the stream, and so on. That is how one Arduino pin can control a whole ring, and why the DOUT pin exists for chaining another ring after it.
Animation And Brightness
Each LED can show a different color and brightness value. By updating the ring one step at a time, you can create motion, sweeps, breathing lights, or progress effects that feel alive instead of static.
Pin Connection
The LED Ring in this simulator uses four pins: GND, VCC, DIN, and DOUT. The Arduino sends data through DIN, power comes in through VCC, and DOUT is used if you want to chain another ring.
That wiring is simple, but the data line still needs to be correct because NeoPixel-style parts depend on clean signal timing. If you connect more rings, the DOUT of the first ring goes to the DIN of the next one.
Powers the LED Ring so the addressable LEDs can light and animate.
Shares the same electrical reference as the Arduino.
Carries the pixel data from the Arduino into the first LED in the ring.
Passes the remaining data forward when you chain another ring.
Why Use Adafruit_NeoPixel Library
The Adafruit_NeoPixel library makes the LED Ring much easier to control because it handles the low-level timing and pixel updates for you. Instead of manually managing the data stream, the sketch can focus on what each LED should show on this ring.
That matters because NeoPixel-style LEDs are timing-sensitive. If the timing is wrong, the ring can flicker, show the wrong colors, or stop updating cleanly. The library hides that complexity and gives you a simple set of functions for turning pixels on, clearing the ring, and sending the changes all at once.
This is the same family of library people also use with other WS2812-style displays. For the LED Ring, it is still a good fit because the ring needs precise color control, smooth animations, and a simple way to update many LEDs from one Arduino pin.
It also keeps the code readable. With the library, you can set colors with setPixelColor(), control brightness, and push updates with show() without writing a custom driver. That makes it a better choice for beginner projects, animation demos, and anything that needs the ring to stay smooth and predictable.
Code
This example lights the LEDs in a moving pattern. It uses the NeoPixel library so the Arduino can set each LED color and then update the ring all at once.
That pattern is a simple first test. Once it works, you can change the colors, add brightness control, or create a more advanced animation based on a sensor or timer.
How The Code Works, Part By Part
Let's break the sketch into smaller pieces so the animation logic is easier to understand and easier to modify later.
Library Setup
The sketch starts by loading the NeoPixel library and defining how many LEDs are in the ring. Then it creates the ring object so the Arduino can talk to the display without handling the timing by hand.
Setup
In setup(), the ring is initialized, cleared, and shown once so the LEDs start from a known state. That avoids odd startup behavior when the sketch first runs.
Animate The Ring
The loop lights one LED at a time by clearing the ring, setting one pixel, and then calling show(). That creates the movement you see around the circle and keeps the sweep easy to follow.
Repeat
The outer loop keeps the animation going, so the ring continues sweeping until the sketch stops.
Wrapping Up
The LED Ring is a strong choice when you want a compact visual effect that feels more alive than a single LED. Because the LEDs sit in a circle, the result works especially well for countdowns, status indicators, and animations that need motion instead of just a steady glow.
The key things to remember are the data line, the update call, and the timing-sensitive nature of NeoPixel-style LEDs. If the ring flickers or shows the wrong colors, the first thing to check is usually the data connection, power stability, or the order of the pixels in the sketch. Once those are handled, the ring is easy to control and very satisfying to animate.
From here, you can try a color sweep, a brightness pulse, or a sensor-driven animation that reacts to sound or movement. That is where the LED Ring starts to feel less like a decorative part and more like a real interface element in an Arduino project.