This article explains the NeoPixel Matrix in a practical way, starting with what the panel does and ending with how the sketch controls it.
A NeoPixel Matrix is a good fit when a project needs a small animated screen rather than a single indicator light. It can show icons, motion, and color status changes without turning the wiring into a long list of separate LED pins.
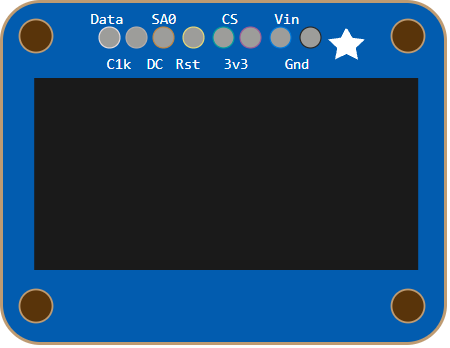
Before diving into the details, it helps to look at the physical module first so the LED grid, board shape, and connection side make sense right away.
Description
A NeoPixel Matrix is a grid of individually addressable RGB LEDs. Each pixel can be set on its own, so the panel can show color changes, motion, and tiny graphics instead of only a single on or off state.
That flexibility is the reason the matrix feels more like a miniature display than a simple LED strip folded into a square. Once the pixels are addressed in rows and columns, the board can show patterns, symbols, and animated frames with very little extra hardware, which is why it shows up so often in clocks, scoreboards, and status panels.
Most NeoPixel matrices are built around WS2812-style LEDs, so a single data line can control the whole surface. That keeps the wiring simple, but it also means the sketch has to send the right pixel order and refresh the whole frame cleanly. If the order is wrong, the image still lights up, but the pixels land in the wrong places.
Features
Here are the main things to know about a NeoPixel Matrix:
| Feature | What it means |
|---|---|
| Individually addressable pixels | Each LED in the grid can show a different color. |
| Row and column layout | Makes it easier to draw icons and small shapes. |
| Single data line | Keeps the wiring compact for Arduino projects. |
| Full RGB output | Supports bright colors and visual effects. |
| Animation-friendly | Works well for motion, indicators, and simple displays. |
| Library support | Often used with Adafruit_NeoMatrix and Adafruit_GFX. |
| Chain output | DOUT lets you connect another matrix after it. |
The important part is not just that the pixels light up. It is that the panel gives you a tiny coordinate system, so you can think in x and y positions instead of one long row of LEDs. That mental shift makes the display much easier to program once you want text or a simple icon.
How Does It Work?
The NeoPixel Matrix receives a serial data stream on DIN. Inside the panel, each LED reads the data it needs and passes the remaining data to the next pixel, so one pin can control the full matrix. The wiring stays compact, but the code still has to respect the board layout.
That is what makes the panel so efficient for compact graphics. The Arduino sends a frame of color values, the library maps those values to rows and columns, and the display refreshes as one coordinated image instead of a pile of separate LEDs. When the refresh happens at the right time, the motion feels smooth instead of flickery.
Pixel Order
The library needs to know how the pixels are arranged physically. Some matrices snake across each row, while others follow a different order, so the matrix setup has to match the board or the icons will appear in the wrong place. If you ever see a smiley face mirrored or upside down, the layout flags are usually the first thing to check.
Frame Refresh
After the sketch updates the pixel colors, it calls show() to push the new frame to the display. Without that refresh step, the changes stay in memory and nothing visible changes on the board, which is a common reason beginners think their drawing code is broken.
NeoPixel Matrix Pinout
The pin names on the matrix are straightforward: power, ground, one data input, and one data output for chaining. That is enough for a single display, and it keeps the part friendly for beginners who want a clean wiring path. In practice, most first builds only use VCC, GND, and DIN.
| Pin | Meaning |
|---|---|
VCC | Power supply for the LED matrix |
GND | Ground reference |
DIN | Data input from Arduino |
DOUT | Data output for chaining another matrix |
If the matrix looks dim, unstable, or oddly colored, the problem is often on the power side first. These panels can draw noticeable current when many pixels are bright at once, so solid 5V and ground connections matter. A weak supply often shows up as random colors, a display that resets, or pixels that fade when the animation gets brighter.
Arduino With NeoPixel Matrix
This circuit preview shows a single NeoPixel Matrix connected to an Arduino Uno. It is a simple setup, but it already demonstrates the important idea: one data pin can drive an entire grid when the code knows the pixel layout. That is the part that makes the display feel powerful even though the wiring stays small.

Pin Connection
The connection map below shows the basic wiring for the Arduino preview. The display only needs power, ground, and one data pin for the first matrix in the chain, so the first test setup is easy to build on a breadboard.
Supplies power to the NeoPixel Matrix.
Shared ground reference for stable signaling.
Carries the pixel data stream from Arduino.
Because this matrix uses addressable LEDs, the Arduino does not control each pixel with a separate wire. It sends one stream of data, and the panel handles the rest internally. That is why the sketch matters more than the wire count once the hardware is connected.
Arduino Code
This example lights a small moving square on the matrix. It is simple on purpose, because the goal is to show how the row and column logic works before you build a more detailed animation. A tiny moving block is easier to debug than text when you are still checking the orientation.
About Adafruit_NeoMatrix Library
The Adafruit_NeoMatrix library builds on Adafruit_NeoPixel and turns a long LED chain into a two-dimensional drawing surface. Instead of thinking in LED numbers, you work with x and y positions, which makes the matrix feel much more like a tiny screen than a strip of lights. That is the main reason the library is such a good fit for icons, labels, and simple animations.
That is the big idea behind the library: it keeps the wiring and pixel addressing hidden so your sketch can focus on graphics.
Once the matrix is defined correctly, you can draw text, shapes, icons, and animations using the same general workflow as other Adafruit graphics displays.
For beginners, that means less time counting LEDs and more time seeing something useful on the screen.
The library also depends on Adafruit_GFX, which is why common graphics commands like drawing lines, rectangles, text, and filled shapes feel familiar if you have used Adafruit LCD or OLED tutorials before.
If Adafruit_NeoPixel is the hardware layer, then Adafruit_GFX is the drawing language on top of it.
That pairing is what makes the library feel polished instead of raw.
A typical setup needs three include files:
The constructor turns the physical panel into something the library can draw on.
widthandheightset the matrix size.pinsets the data pin.layout flagstell the library where pixel 0 starts and whether rows snake back and forth.
If the layout flags do not match the board, the image can look mirrored, rotated, or scrambled.
The basic workflow is simple: call begin() in setup(), draw pixels or shapes, then call show() to update the LEDs.
Without show(), nothing visible changes.
Three other ideas matter a lot:
- Brightness: use
setBrightness()to keep the display readable and reduce power draw. - RAM: every pixel uses memory, so larger matrices can run out of space on small boards.
- Gamma:
Color()helps colors look more natural to the eye.
If your matrix wiring is unusual, remapping lets the sketch keep using simple x and y coordinates while the library handles the real LED order.
That is the main reason Adafruit_NeoMatrix works so well for icons, labels, and small animations.
How The Code Works, Part By Part
Let's break the sketch into smaller pieces so the matrix logic is easier to understand and easier to adjust later.
Libraries
The sketch loads the NeoPixel, NeoMatrix, and GFX libraries. Together they give the Arduino the tools to control the LED grid and draw in 2D coordinates.
Matrix Object
The matrix object stores the size, pin, and layout settings. Those options tell the library how the physical LEDs are arranged on the panel, which is the part that keeps x and y coordinates mapped correctly.
Setup
In setup(), the matrix is started, brightness is set, and the screen is cleared so the display begins from a known state. That prevents leftover pixels from showing up on the first frame.
Draw A Frame
The loop clears the screen, draws a small group of pixels, and then refreshes the matrix. That creates a simple animated shape on the panel without needing complex animation code.
Repeat
The delay keeps the animation visible long enough for the eye to follow before the next frame is drawn. If the delay gets too short, the movement can feel too fast to read clearly.
Wrapping Up
The NeoPixel Matrix is a strong choice when you want a compact display that can show shapes, icons, and motion without extra wiring complexity. It gives you the feel of a tiny screen while still staying friendly for Arduino projects.
Once you understand the pixel order, the single data line, and the refresh step, the matrix becomes easy to trust. From there, you can build clocks, animated status panels, simple meters, or tiny emoji-style displays that feel much more polished than a plain LED strip.
If your next project needs a brighter or more expressive visual output, this is one of those parts that rewards a little setup work up front. After the wiring and coordinate mapping are in place, the sketch can focus on the animation itself instead of fighting the hardware.