This article is a guide about the Ultrasonic Sensor HC-SR04. We will explain how it works, show some of its features, and share an Arduino project example you can follow in your own build.
Before we get into the pinout and code, let’s start with what the HC-SR04 looks like and why it is such a common choice for distance sensing projects.
Description
The HC-SR04 is an ultrasonic distance sensor that measures how far away an object is by sending out a sound pulse and listening for the echo that comes back.
It is one of the most popular beginner-friendly modules because the wiring is simple and the idea behind the measurement is easy to understand.
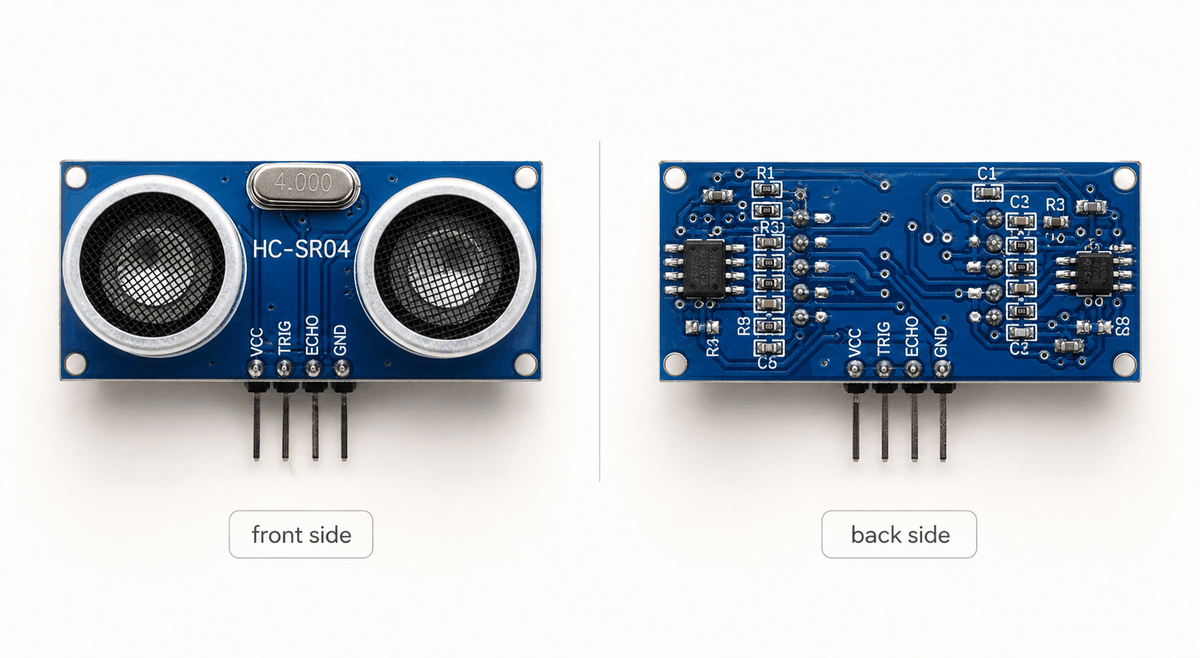
The front side shows the two round ultrasonic heads that handle the sound burst and the returning echo, while the back side contains the small support circuit that helps the module manage timing and output signals.
Together, these parts make the sensor behave like a tiny sonar system.
In real projects, the HC-SR04 is often used in robot cars, obstacle alarms, smart bins, liquid level checks, and simple distance meters. Whenever a project needs to notice whether something is close or far, this sensor is usually a good fit.
Because it is useful in those kinds of projects, the sensor usually runs on 5V and can measure from about 2 cm to 400 cm. It is not designed for laboratory-grade precision, but it gives very useful results for learning, prototyping, and small embedded projects where quick distance feedback matters more than perfect accuracy.
Features
Here are the main things to know about the HC-SR04:
| Spec | Value |
|---|---|
| Power supply | 5V DC |
| Quiescent current | < 2 mA |
| Working current | 15 mA |
| Operating frequency | 40 kHz |
| Ranging distance | 2 cm to 400 cm |
| Measured angle | 30 degrees |
| Effective angle | < 15 degrees |
| Resolution | 0.3 cm |
| Trigger pulse width | 10 µs TTL pulse |
| Echo output | TTL pulse proportional to distance |
| Module size | 45 mm x 20 mm x 15 mm |
After looking at its shape, range, and operating voltage, it becomes easier to see why the HC-SR04 is such a practical choice for beginner builds and small prototypes.
Once you understand the basic measurement idea, you can use the sensor more confidently in your own Arduino projects and connect it with other components later.
How Does It Work?
The image below shows the full measurement loop in a simple way. The Arduino sends a short trigger pulse to the sensor, the sensor fires an ultrasonic wave, and the wave bounces off an object before returning as an echo.
This is the basic idea behind every distance reading the module gives you.
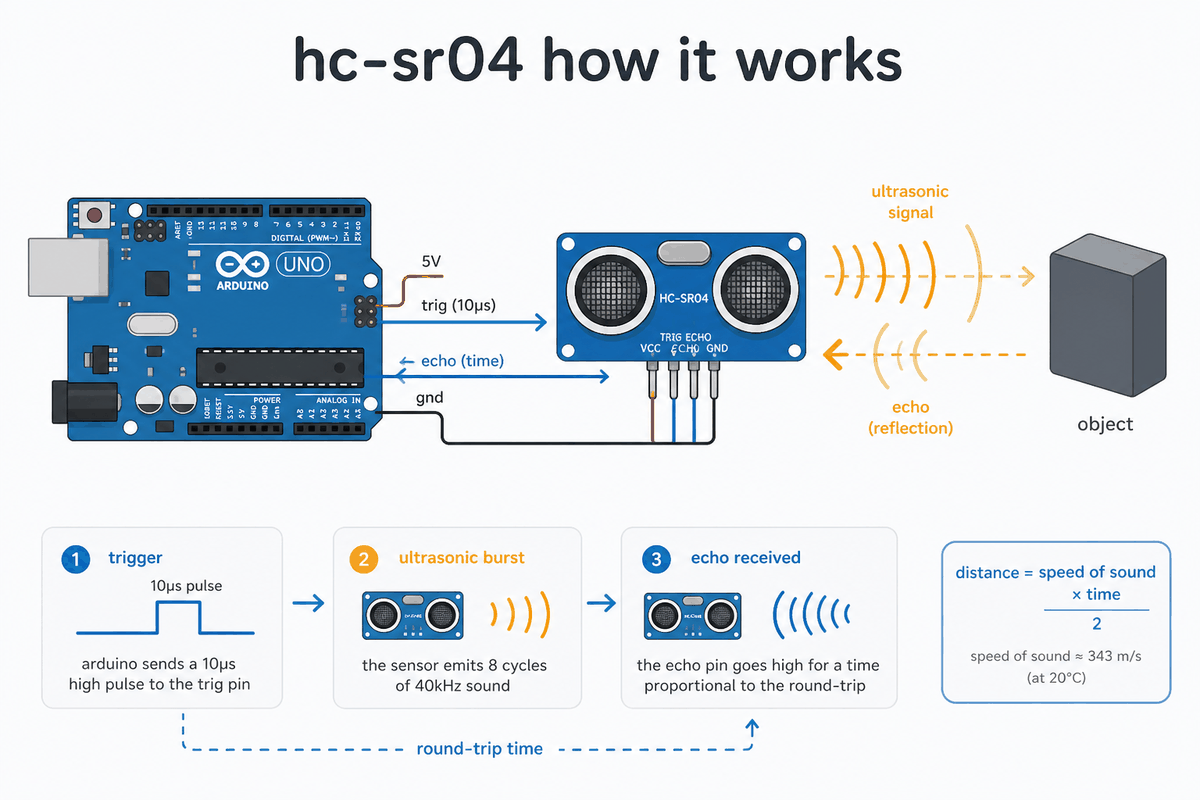
Trigger Pulse
The Arduino sends a short pulse on TRIG to begin one measurement.
That pulse tells the sensor to fire its ultrasonic burst, so this is the moment the reading starts. Think of it like pressing a start button: without that signal, the sensor does not know when to begin the distance check.
Echo Bounce
The sensor sends out a sound pulse, listens for the echo that comes back, and uses that travel time to estimate how far away the object is.
If the object is flat and close, the echo returns quickly. If the object is farther away, the echo takes longer to come back.
Round Trip Time
That round trip is the whole trick. If the object is close, the echo comes back faster. If it is farther away, the echo takes longer to return. The HC-SR04 turns that timing into a distance reading the sketch can use, so the Arduino does not need to guess the distance by itself.
Once you see that timing change, the rest of the code becomes easier to follow because every line is just helping the Arduino send the pulse, wait for the echo, and convert that delay into a distance value.
The common distance formula is simple:
Distance (cm) = Time (µs) × 0.034 / 2
The number 0.034 comes from the speed of sound in air, which is about 343 m/s or 0.034 cm/µs. The division by 2 is there because the sound has to travel to the object and then back again. If you measure the time in microseconds, this formula gives you a quick distance estimate in centimeters.
- The microcontroller sends a short pulse on
TRIG. - The sensor sends out an ultrasonic burst and waits for the echo.
- The
ECHOpin stays high for the round-trip time, and the sketch converts that time into distance.
That echo timing is the important part. A short pulse means the object is close. A longer pulse means it is farther away.
After that, the sketch just turns the timing into a distance value, which is why this sensor is so useful for beginner projects.
The reading can change a little if the room is very hot or cold. It can also jump around if the surface is angled, soft, or too small. That is normal for this kind of sensor, and it is one reason people sometimes take a few readings and average them.
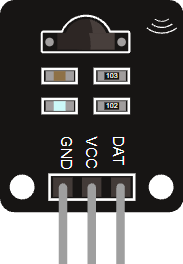
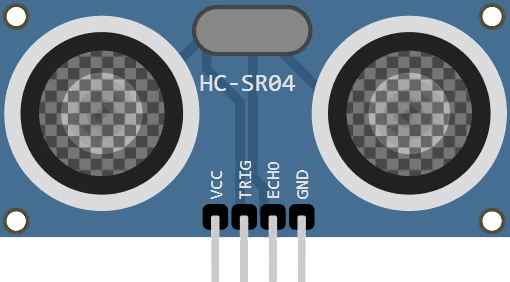
HC-SR04 Ultrasonic Sensor Pinout
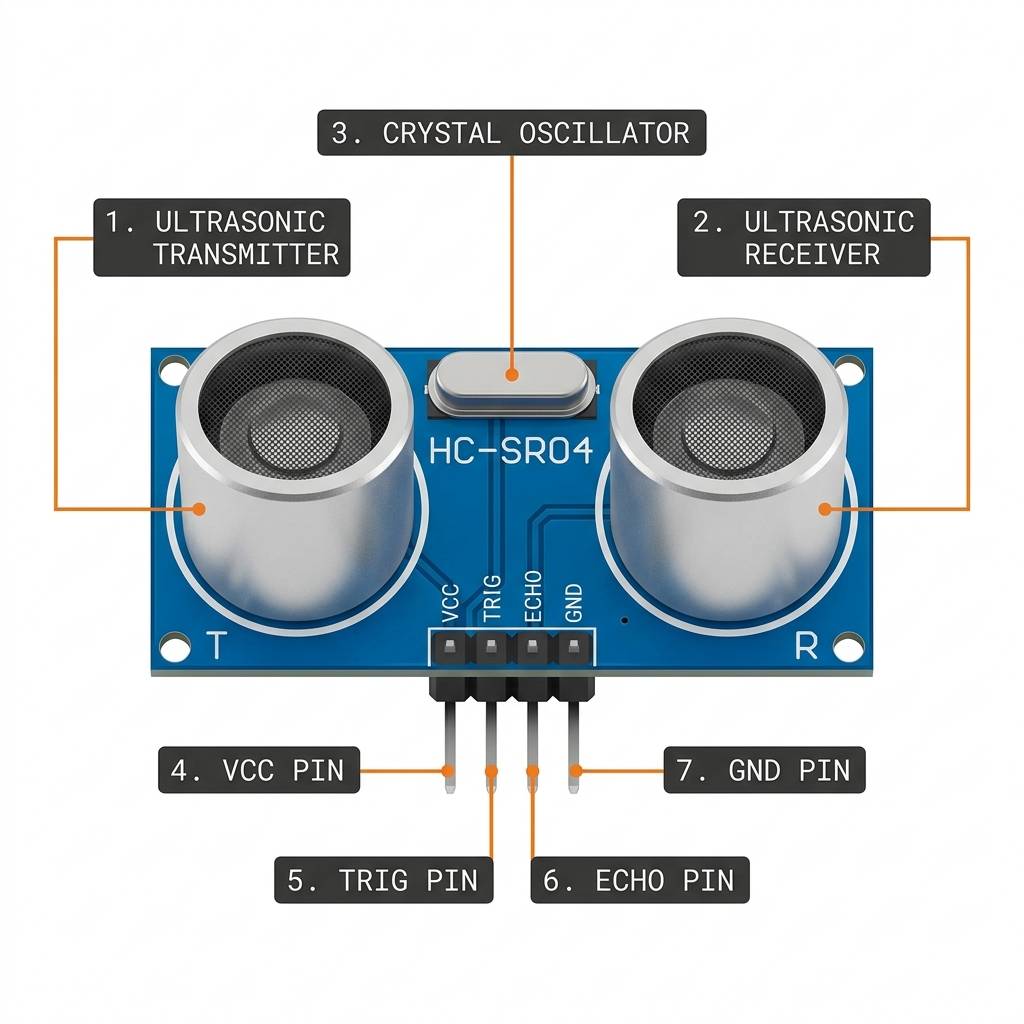
The pinout image above shows the full HC-SR04 module from left to right. Even though it only uses four pins, each pin has a very specific role in the measurement cycle, and that is what makes the wiring easy to understand once you look at it part by part.
VCC is the power pin. It usually connects to 5V so the module can power its ultrasonic transmitter, receiver, and internal timing circuit. Without a steady supply here, the sensor will not send a stable distance reading.
TRIG is the start pin. The Arduino sends a short HIGH pulse on this pin to ask the sensor to begin one measurement.
That pulse tells the module to send out a burst of sound, so you can think of it as the sensor's go signal.
ECHO is the response pin. After the sensor sends the sound wave, it raises this pin for the amount of time needed for the echo to return.
The Arduino measures that HIGH time and turns it into distance, so this pin is where the useful timing information comes back.
GND is the ground pin. It gives the module and the Arduino the same electrical reference, which keeps the trigger and echo timing consistent. A shared ground is always important for clean sensor behavior.
| Pin | Meaning |
|---|---|
VCC | 5V power |
TRIG | Trigger input |
ECHO | Pulse output for timing |
GND | Ground |
On some 3.3V boards, the ECHO pin may need extra care because many HC-SR04 modules send a 5V pulse. For an Arduino Uno, the wiring is straightforward, which is why it is such a common first example.
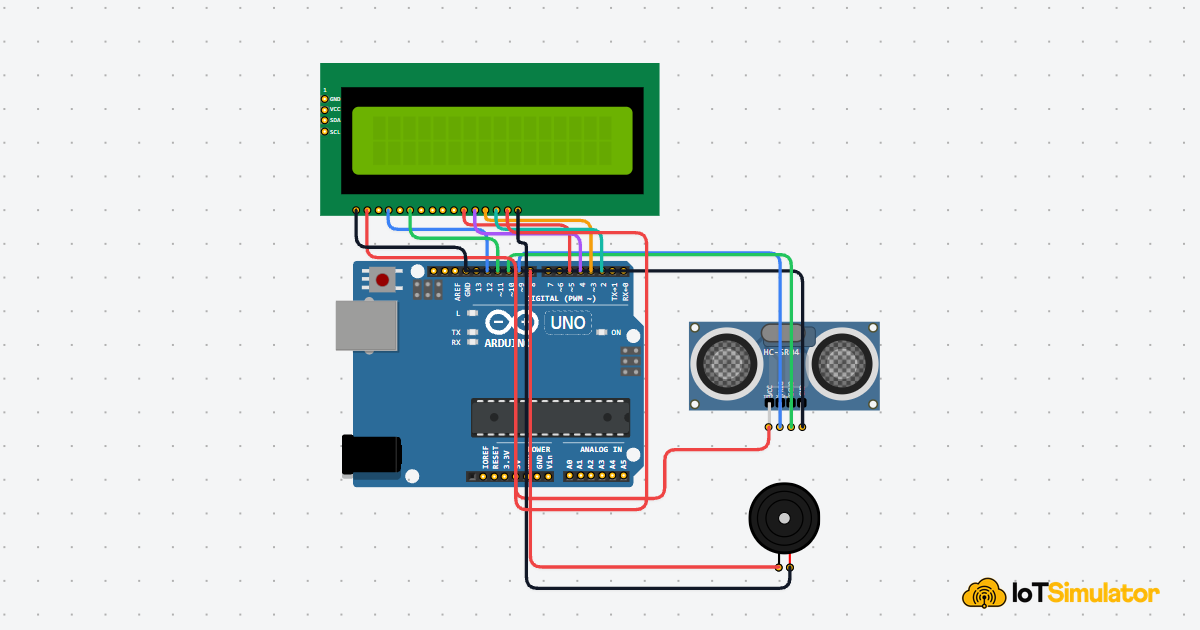
Arduino with HC-SR04 Sensor

This sensor is often used with Arduino boards because the wiring is easy and the result is easy to understand. A simple example reads the distance in Serial Monitor and prints a new value every short moment.
The first useful sketch usually does three things: send a trigger pulse, wait for the echo, and print the result. After that, you can add your own ideas, like turning on an LED when something gets close or stopping a motor before a collision.
That is also why the HC-SR04 is popular for learning. It shows how a sensor can turn a real-world event into a number that code can use.
Pin Connection
The pin map is simple once you split the module into power, trigger, echo, and ground.
In a typical Arduino Uno setup, the sensor uses two digital pins for the timing signals and two power pins for stable operation.
Powers the sensor so the ultrasonic transmitter and receiver can work.
Shares the same ground reference with the Arduino.
Starts one measurement by sending a short trigger pulse.
Returns the pulse width that represents the round-trip time.
For a stable result, keep the sensor facing the target and avoid placing it at a sharp angle. Flat and solid surfaces usually give the best readings. Soft material, thin fabric, or tiny objects can reduce the return echo and make the measurement less stable.
Code
A basic sketch sets the trigger pin as an output, the echo pin as an input, sends a short pulse, reads the echo with pulseIn(), and prints the result.
That is enough for a first working example.
Most examples also print the distance to Serial Monitor so you can see the raw number while testing.
That helps you check the wiring, the pin numbers, and the timing before you add an LCD, buzzer, or motor response.
In a small project, this is often the easiest way to debug the whole sensor chain.
The logic is small, but there are a few important details. The trigger pulse must be short, the echo read should wait only as long as needed, and the conversion step must match the unit you want to display.
If you later use averages or thresholds, this same core sketch still gives you the raw measurement data you need.
How The Code Works, Part By Part
Let's continue from the full sketch above and break it into small parts.
Each section does one simple job, so the code is easier to read and easier to remember.
Pin Setup
First, the Arduino tells the sketch which pins it will use.
trigPin sends the pulse, echoPin reads the return signal, and Serial.begin(9600) opens the monitor so you can see the result while testing.
Trigger Pulse
Next, the sketch sends a very short HIGH pulse on TRIG.
That pulse tells the HC-SR04 to send one ultrasonic burst. The pulse only needs to last about 10 microseconds.
Echo Timing
After the burst, pulseIn() waits for the ECHO pin to stay HIGH and measures that time.
A short HIGH time means the target is close. A longer HIGH time means the target is farther away.
Distance Conversion
After the timing is measured, the sketch turns that value into centimeters.
The code multiplies by 0.0343 because that is the speed of sound in centimeters per microsecond, then divides by 2 because the sound travels to the object and back again.
Output And Repeat
Finally, the sketch prints the distance, waits a short moment, and starts again.
This keeps the reading stable and makes the result easy to watch in real time.
Source code with NewPing Library
If you want a shorter version, the NewPing library keeps the same idea but makes the sketch easier to read.
The sketch below uses the library helper to handle the timing for you, which is nice when you are first learning or when you want a cleaner project file.
The NewPing library does the timing work for you, so the sketch becomes shorter.
That makes it useful when you want to focus more on the project idea and less on the tiny timing details.
The NewPing object is created with the trigger pin, echo pin, and the maximum range you want to read.
After that, ping_cm() gives you a distance reading in centimeters, which keeps the loop very easy to follow.
If the sensor cannot detect anything clearly, the sketch prints Out of range. That small check is helpful for beginners because it shows that sensor values can fail sometimes, and the program should handle that nicely.
NewPing is a cleaner option when you want the same result with less timing code.
You still wire the sensor the same way, but the library handles the ultrasonic pulse measurement for you, which makes the sketch easier to read and maintain.
Wrapping Up
The HC-SR04 is a great sensor when you want a simple distance measurement that is easy to explain.
Keep the target surface clear, wire it correctly, and it will work well in small robots, warning systems, and beginner demos.
Once you understand how the trigger and echo timing work, you can reuse the same sensor in many places.
A small robot can stop before hitting a wall, a display can show the distance in real time, or a buzzer can warn when something gets too close. That is what makes the HC-SR04 such a useful part for learning and for small real projects too.