This article is a guide about the MicroSD Card module. We will explain how it works, show how it is wired, and walk through an Arduino example you can use in your own projects.
The MicroSD Card is useful when a project needs to save data or read files. It gives a small project a place to store information that can be opened again later instead of disappearing when the board turns off.
Before we jump into the details, it helps to look at the real module first so the card slot, connector, and board shape are easier to understand.
Description
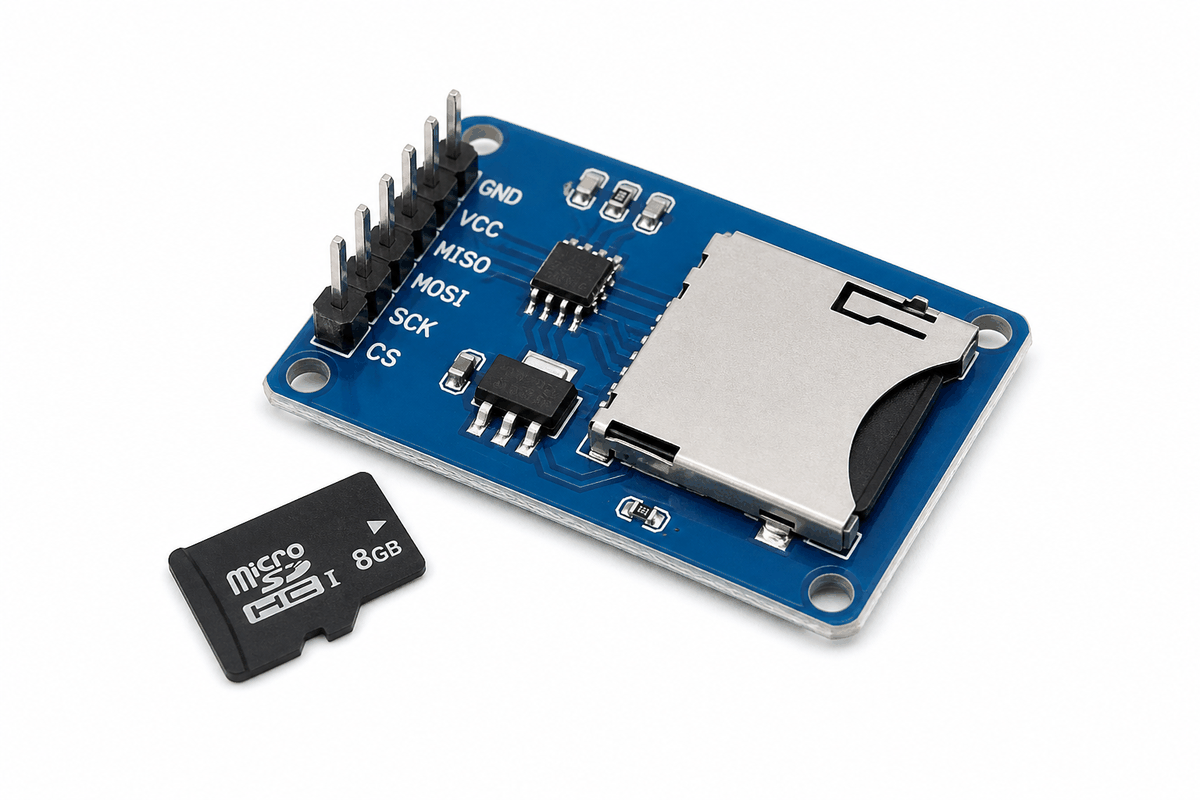
The MicroSD Card module is a small breakout board that lets Arduino read from and write to removable flash storage. It is commonly used for data logging, audio projects, image loading, configuration files, and any project that needs more storage than the microcontroller itself provides.
Instead of acting like a processing board, this module acts like a storage device. That means the Arduino sends commands, and the card responds with file data, storage blocks, or card information depending on what the sketch asks for.
Because the card is removable, it is also convenient for testing. You can record data, remove the card, and open the files on a computer to check what the Arduino saved.
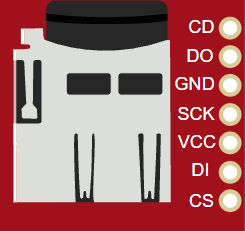
Some module versions look a little different, but the idea stays the same. The important part is the card socket and the small SPI-style pin set, because that is what lets the Arduino talk to the storage card in a predictable way.
Features
Here are the main things to know about the MicroSD Card module:
| Feature | What it means |
|---|---|
| Removable storage | Lets Arduino store files on a microSD card. |
| SPI interface | Uses MOSI, MISO, SCK, and CS for communication. |
| Data logging | Useful for sensor records and project history. |
| File access | Can create, read, and write files with the SD library. |
| Card detect | Optional pin for checking whether a card is inserted. |
| Beginner friendly | Good introduction to storage and file handling. |
The most useful part is that Arduino can write data in a way that you can later open and inspect on a computer.
How Does It Work?
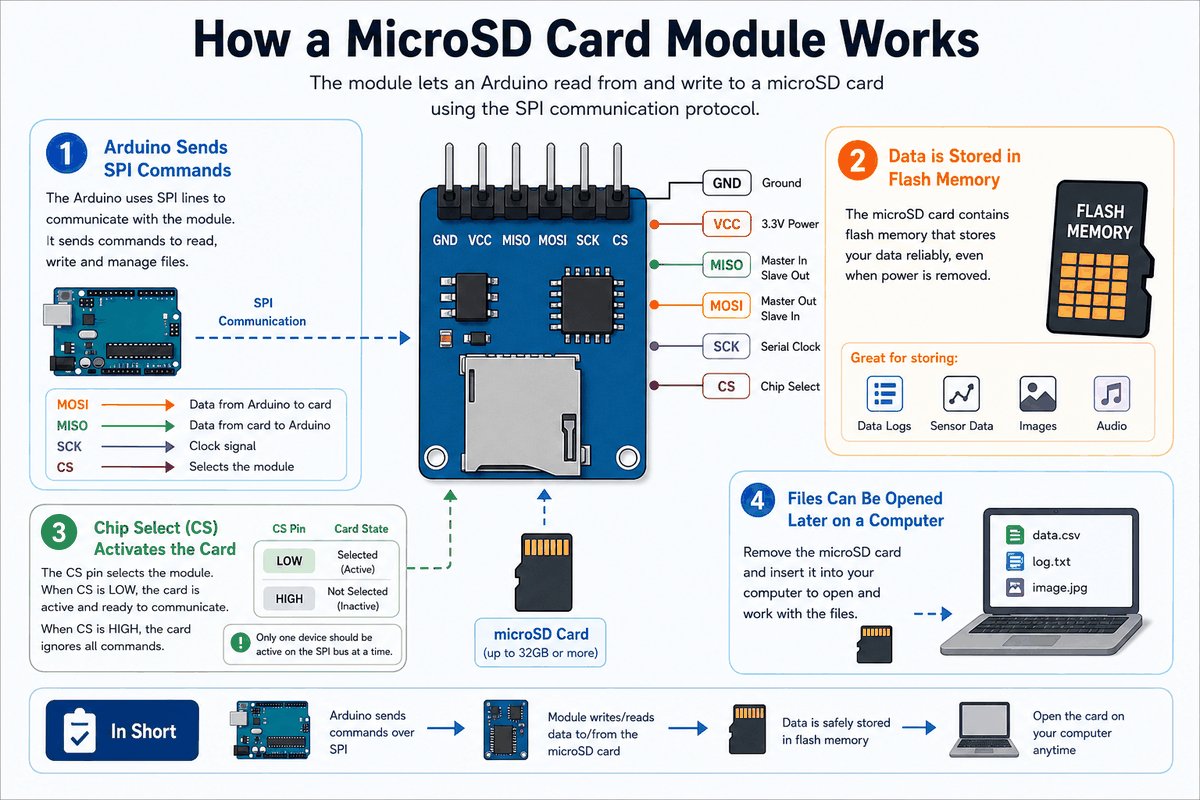
The MicroSD module connects to the Arduino over SPI. The Arduino uses the CS pin to select the card, the DI and DO lines to send and receive data, and SCK to keep the communication synchronized.
When the sketch opens a file or writes a line of text, the library turns that high-level request into SD card commands. The card then stores the data in flash memory so it stays there even after power is removed.
SPI Data Flow
The SPI bus is the important idea here. The Arduino sends bytes quickly over DI and SCK, and the card returns data on DO. That makes the card fast enough for reading files or logging sensor values without making the wiring too complicated.
Card Detect
The CD pin is optional, but it is handy if you want the sketch to know when a card is inserted or removed. Some holders use a different detect polarity, so it is worth checking the module before relying on that pin.
Technical Notes
For this Arduino workflow, the safest cards are the ones formatted as FAT16 or FAT32. Arduino's SD library is documented as supporting FAT16 and FAT32 on standard microSD and microSDHC cards, and the SD Association classifies cards up to 2GB as SD with FAT12 or FAT16 and cards from 2GB up to 32GB as SDHC with FAT32.
That means a small card is often the least surprising choice when you are building a simple logger. In practice, 2GB and 32GB are the important capacity markers to remember: SD cards up to 2GB are the older SD family, SDHC covers 2GB to 32GB, and cards above that fall into the SDXC family, which the SD Association says uses exFAT. For this sketch, the practical choice is to stay with a properly formatted SD or SDHC card so the file workflow remains predictable.
Another detail that matters is speed. The card itself can be much faster than the sketch needs to be, but the Arduino still talks to it through the SPI pins and the library. That is why storage feels simple from the code side even though the card is doing low-level work behind the scenes.
Arduino With MicroSD Card

This circuit preview shows the MicroSD card module connected to an Arduino Uno so you can understand the SPI layout before reading the sketch. The chip select line matters just as much as the data lines because it tells the card when to listen.
Pin Connection
The pin map below shows the common Arduino Uno wiring for this storage module. If the lines are mixed up, the card often fails to initialize or the sketch cannot open a file reliably.
Powers the module so the card socket and logic can work.
Shares the same electrical reference as the Arduino.
Provides the clock signal that keeps SPI communication in step.
Carries data from the card back to the Arduino.
Carries data from the Arduino to the card.
Selects the card so the library knows when to talk to it.
Optional card-detect input used to check whether a card is inserted.
Once the wiring matches the SPI pins, the card usually becomes straightforward to use. If it still refuses to initialize, the first thing worth checking is the CS line, because that pin decides whether the card actually listens to the Arduino.
About SD Library
The SD library handles the file workflow so the sketch can work with storage in a simple way. It gives you a small set of core functions that cover the full life cycle of working with a card.
SD.begin(csPin): starts the card on the chosen chip-select pin.SD.open(filename, mode): opens or creates a file for reading or writing.File.print()andFile.println(): write text or values into the file.File.read()andFile.available(): read data back from an existing file.File.close(): closes the file so the data is saved properly.
That matters because the card itself does not behave like a simple sensor. It needs commands, file names, and a proper write flow. The library keeps that process readable, which is why the code can stay short even when the storage task is more complex underneath.
When the wiring is correct, the library becomes the part that lets you focus on the project output instead of the card protocol. That is useful for logs, settings files, and any sketch that needs to save something and read it back later.
Arduino Code
This example initializes the card, creates a log file if needed, and writes a short message to it. It is a simple first test that proves the storage module is working.
Once this works, you can write sensor readings, timestamped events, or longer project logs to the card instead of just one test line.
How The Code Works, Part By Part
Let's break the sketch into smaller pieces so the storage workflow is easier to understand and easier to modify later.
Libraries
The sketch loads SPI for the bus protocol and SD for file access. Those two libraries handle most of the low-level card communication for you.
Initialize The Card
The setup block starts Serial Monitor, configures the chip-select pin, and tries to initialize the card. If initialization fails, the sketch stops so you know the card or wiring needs attention.
Open A File
The sketch opens log.txt for writing. If the file does not exist yet, the library can create it for you.
Write And Close
After the file is open, the sketch writes a line of text and closes the file. Closing the file is important because it helps make sure the data is saved properly.
Repeat
This starter example does not need to keep writing forever. In a real project, the loop would add more records whenever a sensor changes or a timer event happens.
Wrapping Up
The MicroSD Card is a simple way to add storage and file saving to an Arduino project, but it becomes much more useful once you treat it as part of the project workflow instead of just a place to dump text.
Once you understand the SPI pins, the chip-select line, and the file workflow, you can use it for data logging, config files, saved measurements, and any project that needs removable storage. In real use, the card is most helpful when the data matters later, because you can pull it out and inspect the file instead of guessing what happened during the run.
From here, a good next step is to log temperature, motion, or button events into a file and open it afterward to see the pattern. That makes the module feel practical right away and gives the storage workflow a clear job in the circuit.