This article is a guide about the Gas Sensor. We will explain how it works, show how it is wired, and walk through an Arduino example you can use in your own projects.
The Gas Sensor is useful when a project needs to detect gas levels or build a simple warning system.
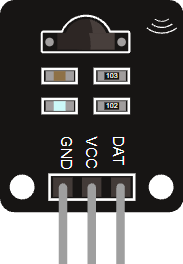
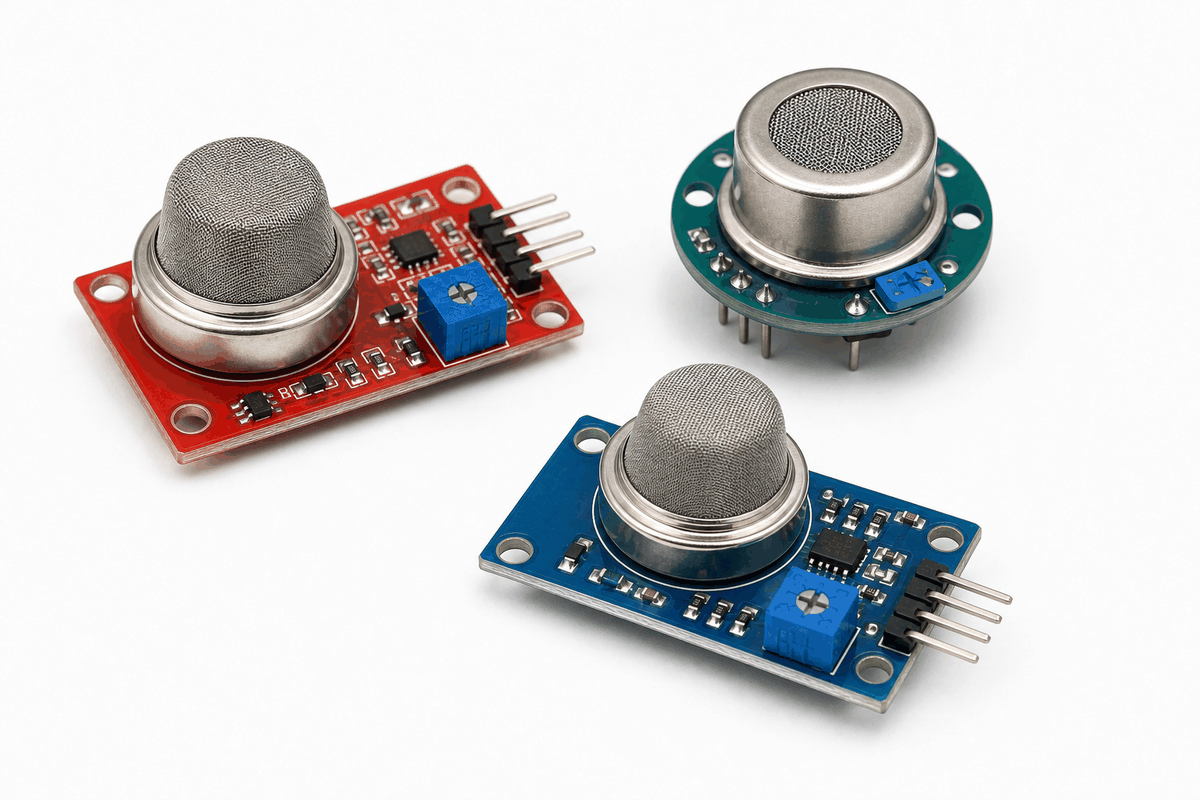
Before we jump into the details, it helps to look at the real module first so the metal sensing can and the small adjustment knob are easier to recognize.
Description
The Gas Sensor module is commonly based on the MQ2 family of sensors. It is used to detect combustible gases such as LPG, propane, methane, hydrogen, and carbon monoxide. In Arduino projects, it is often used as a learning sensor for air-quality style warnings or simple leak detection demonstrations.
The module usually provides an analog output for relative gas level and a digital output for threshold detection. That means you can either watch the raw value change over time or react only when the gas level passes a chosen limit.
This makes it practical for beginner projects because the Arduino can start with a simple number reading and later grow into a full warning or logging system.
Features
Here are the main things to know about the Gas Sensor:
| Feature | What it means |
|---|---|
| Analog output | Shows a changing reading that reflects gas level. |
| Digital output | Acts as a threshold trigger when gas exceeds the set limit. |
| Sensitivity control | The on-board potentiometer adjusts the trigger point. |
| 5V module | Commonly powered from a 5V supply. |
| Beginner friendly | Useful for alarms, monitors, and simple demonstrations. |
| SPI not needed | Works with simple analog and digital pins instead of a bus protocol. |
The key idea is that the module can give you both a raw reading and a threshold signal, so you can pick the behavior that fits the project.
How Does It Work?
The MQ2 sensor changes its electrical resistance depending on the amount of gas around it. The module converts that change into an analog voltage on AO, and the onboard comparator can also turn the DO pin into a simple trigger output.
That is why gas-sensor projects often begin with a raw serial reading and later add a threshold or alarm. The Arduino reads the signal, compares it to a limit if needed, and decides whether it should light an LED, sound a buzzer, or log an alert.
Analog Reading
The analog output is useful when you want to watch the signal change over time or estimate how strong the reading is compared with the baseline.
It gives you a more detailed view of the sensor, which is helpful when you want to tune the threshold or compare readings in different conditions.
Digital Trigger
The digital output is useful when you only want a yes or no response.
On this module family, the trigger point is usually adjusted by the small potentiometer on the board, so the output can switch earlier or later depending on how sensitive you want the module to be.
Gas Sensor Type
MQ sensors look similar from the outside, but each one is usually tuned for a different target gas or gas family. That is why the model number matters when you choose a module for a project.
MQ-2
MQ-2 is commonly used for LPG, smoke, and hydrogen detection. It is also often described in datasheets as suitable for propane, methane, and alcohol, but in hobby projects it is most often introduced as a general combustible gas and smoke sensor.
MQ-3
MQ-3 is commonly used for alcohol detection. It is the MQ sensor family member people usually choose when they want to detect ethanol vapor or build a simple breath-alcohol style demo.
MQ-4
MQ-4 is commonly used for methane detection, which makes it a good match for natural gas monitoring projects.
MQ-7
MQ-7 is commonly used for carbon monoxide, or CO, detection. It is the better-known MQ option when the project needs a carbon-monoxide-focused sensor instead of a general gas detector.
MQ-135
MQ-135 is commonly used for air-quality style sensing. Datasheets for this family describe it for gases such as ammonia, CO2, alcohol, benzene, smoke, and related air contaminants, so it is often used in indoor air-monitoring projects.
Arduino With Gas Sensor
The Arduino setup is straightforward because the sensor gives you both an analog reading and a digital trigger. That means you can watch the raw signal first and then decide whether the project should react with an LED, buzzer, or serial warning.
In this layout, the analog line helps with calibration and the digital line helps with the final reaction. That is a useful pattern because the same sensor can support both learning and a more practical alarm-style build.

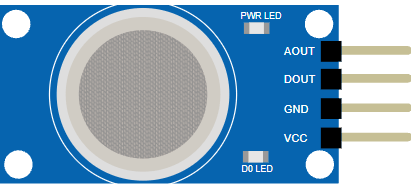
Pin Connection
The connection map tells you which pins matter most when wiring the module to an Arduino. Match power, ground, and the two signal pins carefully so the circuit behaves the way the sketch expects.
Powers the sensor board so the sensing circuit can work.
Shares the electrical reference with the Arduino.
Sends the changing analog gas level for calibration and logging.
Sends a simple trigger when the module crosses the threshold.
Code
This example reads both outputs from the circuit preview so you can see how the topology works in practice. AO goes to A0 for the changing gas level, while DO goes to D2 for the threshold trigger. No external library is needed here because the module already gives a plain analog voltage and a simple digital output, so the Arduino can read it directly with analogRead() and digitalRead().
After this basic readout works, you can add a threshold check to turn on an LED or buzzer when the reading crosses a limit. The analog value gives you the detail, while the digital pin gives you the quick alarm response.
How The Code Works, Part By Part
Let's break the sketch into smaller pieces so the flow is easier to understand and easier to modify later.
Setup
The setup block prepares Serial Monitor and sets the digital pin as an input. That gives you a live view of the sensor values while you test the module and keeps the threshold output ready for use.
Read Signal
The Arduino reads the analog output and the digital output from the sensor. The returned analog value changes depending on the gas concentration the module detects, while the digital pin shows whether the comparator has crossed the set threshold.
Print Value
Printing the values helps you understand the normal range first. After that, it becomes much easier to choose a threshold for an alert or warning light and confirm that the digital trigger behaves the way you expect.
Repeat
The short delay keeps the serial stream readable while the sketch continues monitoring the sensor. If the analog value or the digital trigger crosses the threshold, the sketch can react immediately with a warning message, LED, or buzzer in a bigger project.
Wrapping Up
The Gas Sensor is a useful part when you want the Arduino to react to gas levels in the environment.
Once you understand the analog and digital outputs, you can use this module confidently in warning systems, monitors, and other practical prototype projects.
It is especially useful as a learning part because it shows the full chain from a physical condition to a code decision in a very direct way. The sensor gives the raw value, the comparator can raise a threshold signal, and your sketch decides what action should happen next.
That makes it a nice bridge between simple serial experiments and more useful gas-warning prototypes. If the reading is noisy, you can smooth it in code. If the alarm needs to react faster, you can lean more on the digital pin. Either way, the module gives you enough information to build a practical response without making the first sketch complicated.